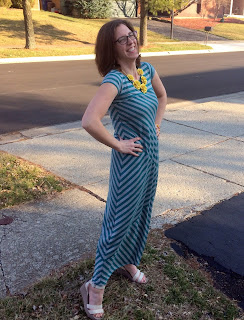
As promised, a short explanation of my process. I can't REALLY call this a tutorial, because I didn't take pictures of each sewing step all along the way. But I can at least give you the ideas. Next time I sew one (because I'm sure there WILL be a next time! I love this dress!), I will totally do a full photo-tutorial!
This dress was the inspiration.
fabric from Girl Charlee.com. This is Teal Green Heather Gray Half Inch Stripe Cotton Jersey Blend Knit Fabric. I got 2 yards of it on clearance. I love the fabric! Color is great, soft to the touch, nice stretch, not just printed on one side-- color is all the way through! Normally 2 yards would be plenty for a maxi for my height. Given that I needed to cut diagonal pieces, however, I would have liked to have at least 2.5 or maybe even 3 yards to make it less fussy next time.
This was my design/math workup. I measured myself to know how long it would need to be from shoulder to floor length.
First thing I did was take an already tailored t-shirt pattern I've worked out to my measurements. About this perfect-for-me fit tee: I created this "Elisa Tee" using several tutorials. I like Its Always Autumn because it is so easy. She also has a fabulous raglan tee tutorial that I have used and loved. I used Rae's angel top measuring instructions as a jumping off point so that I was in the ballpark on the fit I wanted. I adjusted from there by wearing it inside out, pinching the fabric on both sides to tighten and using my wonderclips to mark the changes. Once I got what I wanted, I used THAT as a pattern so I could duplicate my fit on other projects.
Alright, so I took this tee pattern and extended it from the hips in a shallow 'A' fashion using my big ruler. I extended it to the length required in my design sketch notes. No photo to document that I now had a half maxi pattern. I then folded it over again to create a full maxi pattern. This is an extra step for THIS dress that I wouldn't normally do.
Now, for most maxi dresses, you only need a pattern for half your body because you cut the pieces on the fold to have pieces that are symmetrical on both sides. BUT. That would not work with this dress because of the diagonal cuts AND the fact that in order to get the diagonal stripes I had to cut the fabric on the bias (and if you don't know what that is, it means to cut at a 45 degree angle to the grain line, creating a diagonal).
Once I had the full maxi pattern, I eyeballed where I wanted the cuts to hit. for example, I knew I wanted the first cut to be just at or slightly above my hips. then I just tweaked until the pieces looked similar to my design drawing. Drew the line, cut the line. Now I've got the pattern pieces. Note: the seam allowance is NOT included on these pieces. If I wanted to be official, I could make entirely new pattern pieces by tracing these and INCLUDING the seam allowances, but you can see from my multi-colored conglomerate that I was running out of tissue paper. So in the interest of not having any more... I just eyeballed the seam allowance when I cut the fabric out.
To make sure I had matching pieces for front and back (so that my stripes would align on the sides perfectly. I'm ocd like that! lol), I marked on my pattern where the stripes lined up the first time so that I could duplicate the pattern placement for the back pieces. Note: the back bodice on most tees is different than the front, particularly the neckline. Mine is that way too. The front scoop is lower than the back.
Once everything was cut out, it was time to sew!
I sewed the front first. Top bodice portion was first since it was most important to me to get the fit on the bodice part correct. Then I sewed together the 2 bottom diagonals, as you can see they need to fit together before attaching to the top diagonal. Then I laid the entire front of the dress down and layed my back pieces (still not sewn together, over the top to make sure they would line up. Once I was certain of their placement, I clipped the back pieces together and sewed them up.
I aligned and clipped the finished back to the finished front and sewed them together up the side seams. Then I did the sleeves and neck band.
Some great helps:
for detailed instructions on how to sew the binding for the neckline, craftsy.com has a great photo tutorial, though I use clips rather than pins. and Collette as a wonderful explanation of 4 different binding methods, including the math required to get the perfect length on a neck or arm band. Very helpful! I prefer the first method she describes, banding, because it is so easy. I measure the neckline (and it is different for each item I create because it totally depends on little adjustments or slight cutting differences) and then follow Collette's math formula for creating my band rectangle. Then I serge the band into a round, fold it over and serge it half, then attach the perfect band to the neckline using clips, just like craftsy explains with the 4 anchors and stretching it along the way. Serge it all together. Then I top stitch using a double needle with matching or contrasting thread on my sewing machine to really make it look professional.
Tah-dah! All finished!


