Showing posts with label sewing. Show all posts

Saturday, February 25, 2017

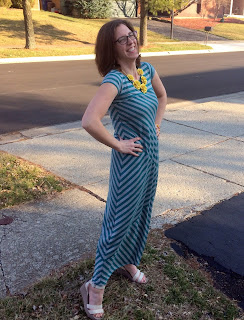
Diagonally Striped Maxi Dress: A 'Sort-of' Tutorial

As promised, a short explanation of my process. I can't REALLY call this a tutorial, because I didn't take pictures of each sewing step all along the way. But I can at least give you the ideas. Next time I sew one (because I'm sure there WILL be a next time! I love this dress!), I will totally do a full photo-tutorial!

This dress was the inspiration.

  fabric from Girl Charlee.com. This is Teal Green Heather Gray Half Inch Stripe Cotton Jersey Blend Knit Fabric. I got 2 yards of it on clearance. I love the fabric! Color is great, soft to the touch, nice stretch, not just printed on one side-- color is all the way through! Normally 2 yards would be plenty for a maxi for my height. Given that I needed to cut diagonal pieces, however, I would have liked to have at least 2.5 or maybe even 3 yards to make it less fussy next time. 
 This was my design/math workup. I measured myself to know how long it would need to be from shoulder to floor length. 
First thing I did was take an already tailored t-shirt pattern I've worked out to my measurements. About this perfect-for-me fit tee: I created this "Elisa Tee" using several tutorials. I like Its Always Autumn because it is so easy. She also has a fabulous raglan tee tutorial that I have used and loved. I used Rae's angel top measuring instructions as a jumping off point so that I was in the ballpark on the fit I wanted. I adjusted from there by wearing it inside out, pinching the fabric on both sides to tighten and using my wonderclips to mark the changes. Once I got what I wanted, I used THAT as a pattern so I could duplicate my fit on other projects.
Alright, so I took this tee pattern and extended it from the hips in a shallow 'A' fashion using my big ruler. I extended it to the length required in my design sketch notes. No photo to document that I now had a half maxi pattern. I then folded it over again to create a full maxi pattern. This is an extra step for THIS dress that I wouldn't normally do.


 Now, for most maxi dresses, you only need a pattern for half your body because you cut the pieces on the fold to have pieces that are symmetrical on both sides. BUT. That would not work with this dress because of the diagonal cuts AND the fact that in order to get the diagonal stripes I had to cut the fabric on the bias (and if you don't know what that is, it means to cut at a 45 degree angle to the grain line, creating a diagonal). 
Once I had the full maxi pattern, I eyeballed where I wanted the cuts to hit. for example, I knew I wanted the first cut to be just at or slightly above my hips. then I just tweaked until the pieces looked similar to my design drawing. Drew the line, cut the line. Now I've got the pattern pieces. Note: the seam allowance is NOT included on these pieces. If I wanted to be official, I could make entirely new pattern pieces by tracing these and INCLUDING the seam allowances, but you can see from my multi-colored conglomerate that I was running out of tissue paper. So in the interest of not having any more... I just eyeballed the seam allowance when I cut the fabric out. 
To make sure I had matching pieces for front and back (so that my stripes would align on the sides perfectly. I'm ocd like that! lol), I marked on my pattern where the stripes lined up  the first time so that I could duplicate the pattern placement for the back pieces. Note: the back bodice on most tees is different than the front, particularly the neckline. Mine is that way too. The front scoop is lower than the back. 

Once everything was cut out, it was time to sew!
I sewed the front first. Top bodice portion was first since it was most important to me to get the fit on the bodice part correct. Then I sewed together the 2 bottom diagonals, as you can see they need to fit together before attaching to the top diagonal.  Then I laid the entire front of the dress down and layed my back pieces (still not sewn together, over the top to make sure they would line up. Once I was certain of their placement, I clipped the back pieces together and sewed them up. 
I aligned and clipped the finished back to the finished front and sewed them together up the side seams. Then I did the sleeves and neck band. 

Some great helps:
for detailed instructions on how to sew the binding for the neckline, craftsy.com has a great photo tutorial, though I use clips rather than pins. and Collette as a wonderful explanation of 4 different binding methods, including the math required to get the perfect length on a neck or arm band. Very helpful! I prefer the first method she describes, banding, because it is so easy. I measure the neckline (and it is different for each item I create because it totally depends on little adjustments or slight cutting differences) and then follow Collette's math formula for creating my band rectangle. Then I serge the band into a round, fold it over and serge it half, then attach the perfect band to the neckline using clips, just like craftsy explains with the 4 anchors and stretching it along the way. Serge it all together. Then I top stitch using a double needle with matching or contrasting thread on my sewing machine to really make it look professional. 

Tah-dah! All finished!

Sunday, February 19, 2017

Sewing Sewing Sewing

I have been sewing like CRAZY!!!

Seriously, there might be a slight manic to it all. See, I have this stash of fabric and want to deplete it enough that it doesn't spill out of my tupperwares for our move, but I already winnowed out the fabric I don't love. So what remains is all stuff I want to use rather than get rid of... And therefore I have had lots of sewing to do as part of my moving preparations! I've been averaging one completed project a week--- which is lightning speed for me!

I made these awesome leggings which I absolutely adore! I bought the double-brushed poly from printknitstudio.com  and LOVE the buttery-softness and the non-sheer stretch! I found a pair of LulaRoe leggings at Goodwill and used them for a pattern, so basically they are my own version at a fraction of the cost. It wasn't hard, but I did have to take the waist yoke apart and re-sew it because originally I made it too large (I gave extra seam allowance bc I figured I could always make them smaller). So happy with the result!


I sewed the girls Valentine's clothes. Fabric from Girl Charlee-- it has adorable hearts and flowers in a trendy tribal print! I did Gwen's first, so her tunic-style handkerchief hem dress (I used a square circle skirt, if that makes any sense) is exactly what I wanted. Gwen loves the spin! Caroline got the fabric remnants for hers, so a dress was out of the question. She wanted a shirt so she could wear it to school. From all the remnant pieces I managed to get the stripes to line up in the front, BUT the sleeve stripes are not symmetrical, which drives me crazy. But she doesn't care, so I am letting it go. I finally had to put a ban on that shirt because she was wearing it multiple times a week and I wanted it be special for Valentine's Day. At least I know she LOVES it!


Striped handkerchief hem dress with a drop waist dress for me. I got this fabric on clearance, so it was a real bargain, and I knew I wanted to use it for a dress like this. Trouble is that the fabric I had constrained me to certain things because I got the bargain lot cuts. For example, the stripe up the sides is a cool color-blocking design element, right? One that I HAD to use because the panels weren't wide enough. I rather like that element. I would have preferred the drop waist to be not quite so dropped with the skirt length making up the difference (right now the proportions feel a little off to me), but I just didn't have enough fabric for that. I like it even if it isn't destined to be my new favorite wardrobe item.


I made the girls these purple floral dresses. I love this dusty rose fabric from Girl Charlee and think these dresses turned out great! Comfy and cute, what more could I hope for?


I made a maternity dress that I suppose I could model for you, but it wouldn't quite look right. lol

I made this wonderful diagonally striped maxi dress! I think it is so flattering! I will do another post later with more info on my design and pattern-creation process for this one.


And guess what? 

Now I can close those fabric tupperwares!!!!!


Friday, January 20, 2017

Drawstring Bags--- Woohoo! Project completed!

 My mom commissioned me to make drawstring bags for all the nieces and nephews (and for grandma and grandpa!) for our upcoming summer family reunion. I intended to have them finished for Christmas... but they weren't ready. My (lame) gift was a WIP picture, lol!

But they are finished now! I love each and every one of these little jewels and hope their recipients love them! 
 My FAVORITE part of this project was creating fabric pairings for each applique theme. 
 I loved this cherry fabric and new it would be adorable for the lining. Finding the sweet polka dot fabric with mini cherries for the front was serendipitous!
 For the boys I got to delve into fun 'manly' fabrics! I LOVED the dino fossil lining and ultimately decided the brown and gold batik would complement it and allow the skull to have center stage. 

Another batik for the lining of this dino bag. 
  Two boys are into trucks and vehicles, so they have similar bags. At least, I used the same fabric for the outside and the lining. This made it more economical!


 Two of the gals like horse-y critters-- but one is into unicorns...

and the other prefers the non-mythical horse. (I LOVED the vintage-y horse fabric that I used for the lining. I would have used it for the outside, but it was too busy to provide adequate contrast to the applique. Plus it is pretty light and I figure that would show dirt and love too easily)

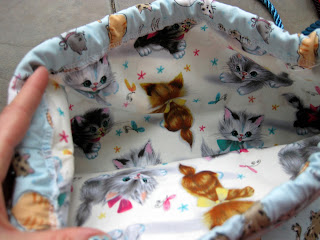
This adorable cat fabric is on a pale aqua, though the pics don't really show it. And the kitten fabric inside just won my heart! Oh, and you wouldn't believe how hard it is to find teal/aqua/turquoise rope for the drawstring! Seriously, I guess it just isn't fashionable right now or something because NOBODY carried it and I looked for months!


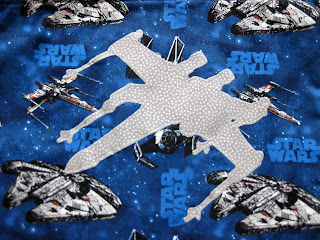
And one boy is all over the Star Wars thing, so this was a given. Actually, It was challenging to find TWO blue-hued fabrics with the classic Star Wars images. Most fabrics have oranges and blacks and draw more from the new Force Awakens images.  

while pairing fabrics was the most fun, completing the appliques was the most challenging and time-consuming. I don't have fancy anything to help with this process (no cricut/silhouette/embroidery machine), so I found the images I wanted online, edited them to size in Word, printed them out, cut them out, used them as a stencil to trace the pattern on fabric, cut the fabric out, ironed the applique onto the bag, and then machine-stitched a zig zag all the way around the design. Some were pretty intricate, so this process took FOR.E.VER. 


Anyway, I'm just so tickled to be finished! I hope my folks like them! And I hope my cute nieces and nephews LOVE their custom bags!

Saturday, November 12, 2016

Catchup: including Halloween and Election Day zoo excursion

What do you call the red sauce in a squeezable bottle that is required for fries and hot dogs?

Cat-sup? Ketch-up? Catch-up? 

Small tangent, but I always think of hotdogs when I say the words "catch up". Because that happens to be how I pronounce the sauce too. :) But since that isn't the point of this post, I'll move on from that random tidbit. :)

Flashback to the end of last month: Halloween pics that I never shared for family to enjoy!
Gwen was Toothless, Caroline was Batgirl and Emmett was a skeleton (by default because it was in his box already and I knew he wouldn't have a special request. Gotta take advantage of those years while they last, right?)
Gwen's wings and tail detach completely from the outfit, so even after Halloween she has been at liberty to wear the Toothless hoodie to school. She loves it!
Caroline wanted to be a super hero and finally settled on Batgirl because she originally wanted to be Batman but wanted to be cute too. Hence the tutu. 
Emmett ended up loving his skeleton-- which turns out to glow in the dark!-- and has requested it for pjs a few times since wearing it for Halloween. 


 Daddy got busy eating the remaining candy after all the trunk or treaters had come around twice already. 
 Halloween night was pleasant! No extra coats required. Kids were so excited to go trick-or-treating! Gwen might look sort of creepy in this pic; she is trying to get her Toothless eyes in the picture. And yes, they are wearing all black costumes. We didn't plan it that way. We went out before it got dark. Don't worry, Grandma Sugar, we were safe!
 After collecting their own candy, Gwen really wanted to be a big girl and hand out candy to the kids still coming around. She volunteered to sit on the steps and hand out with a smile. Of course anything Gwen is going to do, Emmett wants to do too. :) He did say, "Ew gross" about ten times because he was in such close proximity to our already rotting carved pumpkins! lol
 Jumping ahead: Election day trip to the zoo! Kids had no school that day and the weather was really nice. Since the following day (Gwen's birthday) was not so nice, we decided to make this her special birthday outing after hitting the polls. She chose the train as her special treat! Emmett was so excited!
 Obligatory sitting on sculptures for posed photos. I was honestly impressed that Emmett consented to be in this pic. He is usually a little worried around the sculptures and doesn't like to be far from Mommy.
 One of the things I love best about the zoo is that EVERY time you go, you have a different experience. This time there were 2 highlights. The first was watching and listening to the gibbons put on a show of hoopin and hollerin while we ate our lunch. The other best thing was the manatee house! There were 2 baby manatees who were very active and constantly surfacing to munch more lettuce. There was also a sea turtle who wasn't shy and kept circling the tank along the glass. But Caroline was most excited about this sting ray that swam right up beside her and proceeded to take a nap! Sorry for the blurry pic. I decided to share it anyway because Emmett was in it too. 
Caroline was pretty sure that meant they were the best of pals. :) Emmett just stood so still with his little face pressed up against the glass for what seemed like 20 full minutes (it was probably less than that, but anything more than 2 seems miraculous for that age, right?). We went to the gift shop afterwards and the kids each picked out 75 cent little mini sea creatures with their allowance earnings. Emmett chose a manatee and wants to carry it with him all the time. I told him he couldn't take it to bed (the thing is just too teeny and would get lost!) and he cried and cried. 

But he got over it. He was worn out. :)

Next post will be Gwen's birthday party, which we just successfully enjoyed this morning! 

Friday, November 4, 2016

Baptism Photos

 This is a big deal for our family. Gwen is our first to be making this sacred covenant of baptism. The dress was a bridal train I found at a thrift store (talk about a financial SCORE!!!) and cut the diy pattern out. She helped with the design, just a bit. There was some pattern-fitting trauma bc she grew so much between drafting the pattern and finishing the dress. But I took a deep breath, wielded my seam ripper, and reworked it. I am glad I did. Fits her perfectly now! My favorite part is that the sleeves are jersey knit. TOTALLY a comfortable dress!
I took her out for a photo shoot (okay, 2 shoots) and she LOVED the special time with Mommy!
 This awesome rock staircase is a hidden gem! 


 She calls this the "Cinderella picture" even though technically Cinderella ran DOWN stairs rather than up. 


 This is probably the best pic I have showing the back of the dress. 
So proud of Gwen for wanting to follow Jesus Christ! I can't believe this time is here. But I know Gwen is ready to take this step. She has a fervent testimony and wants to be good. She loves the Savior. She loves others. She is growing up.